I spent the better part of three summers pouring lighter fluid on charcoal and wondering why my burgers always had a faint chemical edge. A neighbor finally set me straight: stop using lighter fluid. He handed me a beat-up metal chimney starter and said, 'Your coals will be ready in twelve minutes and your food will taste like food.' He was right. That was nine years and probably five hundred fires ago.
If you are still using lighter fluid, I am not here to shame you. It is what everyone does when they first start grilling because the can is right there next to the charcoal at the hardware store and nobody tells you there is a better way. But the chimney starter method is faster, costs you nothing beyond the starter itself, and most importantly it leaves absolutely zero petroleum taste on your food. Once you switch, you will not go back.
Stop fighting lighter fluid before every cook
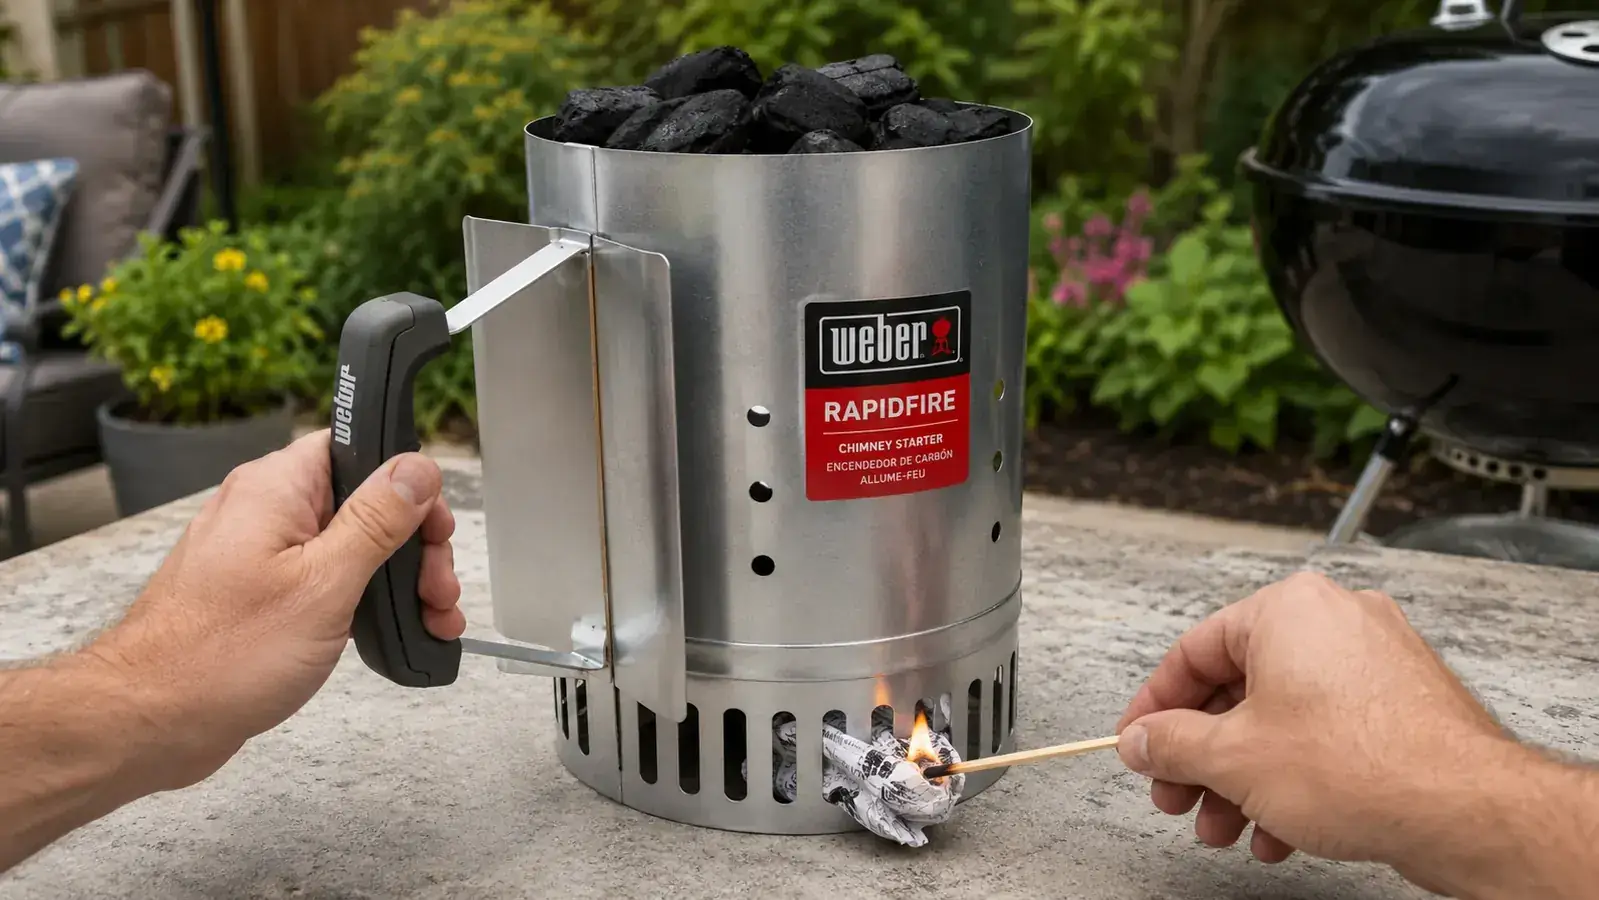
The Weber Rapidfire Chimney Starter (4.8 stars, 42,000+ reviews) lights a full load of charcoal in under 15 minutes using nothing but a couple sheets of newspaper. It is the tool I reach for every single time I fire up the grill.
Amazon Check Today's Price on Amazon →What You Need Before You Start
The gear list is short. You need a chimney starter (I use the Weber Rapidfire, which I will talk about in a minute), a bag of charcoal, and two or three sheets of newspaper. That is genuinely it. No lighter fluid, no fire starters, no special firestarter cubes unless you want them. Regular newspaper is free, and it works perfectly.
A quick word on charcoal: briquettes and lump charcoal both work fine in a chimney. Briquettes are more forgiving for beginners because they burn evenly and you can predict how long they last. Lump charcoal lights a bit faster and burns hotter, but it has irregular shapes that can sometimes restrict airflow in the chimney if you pack it carelessly. Either one will get you where you need to go with this method.
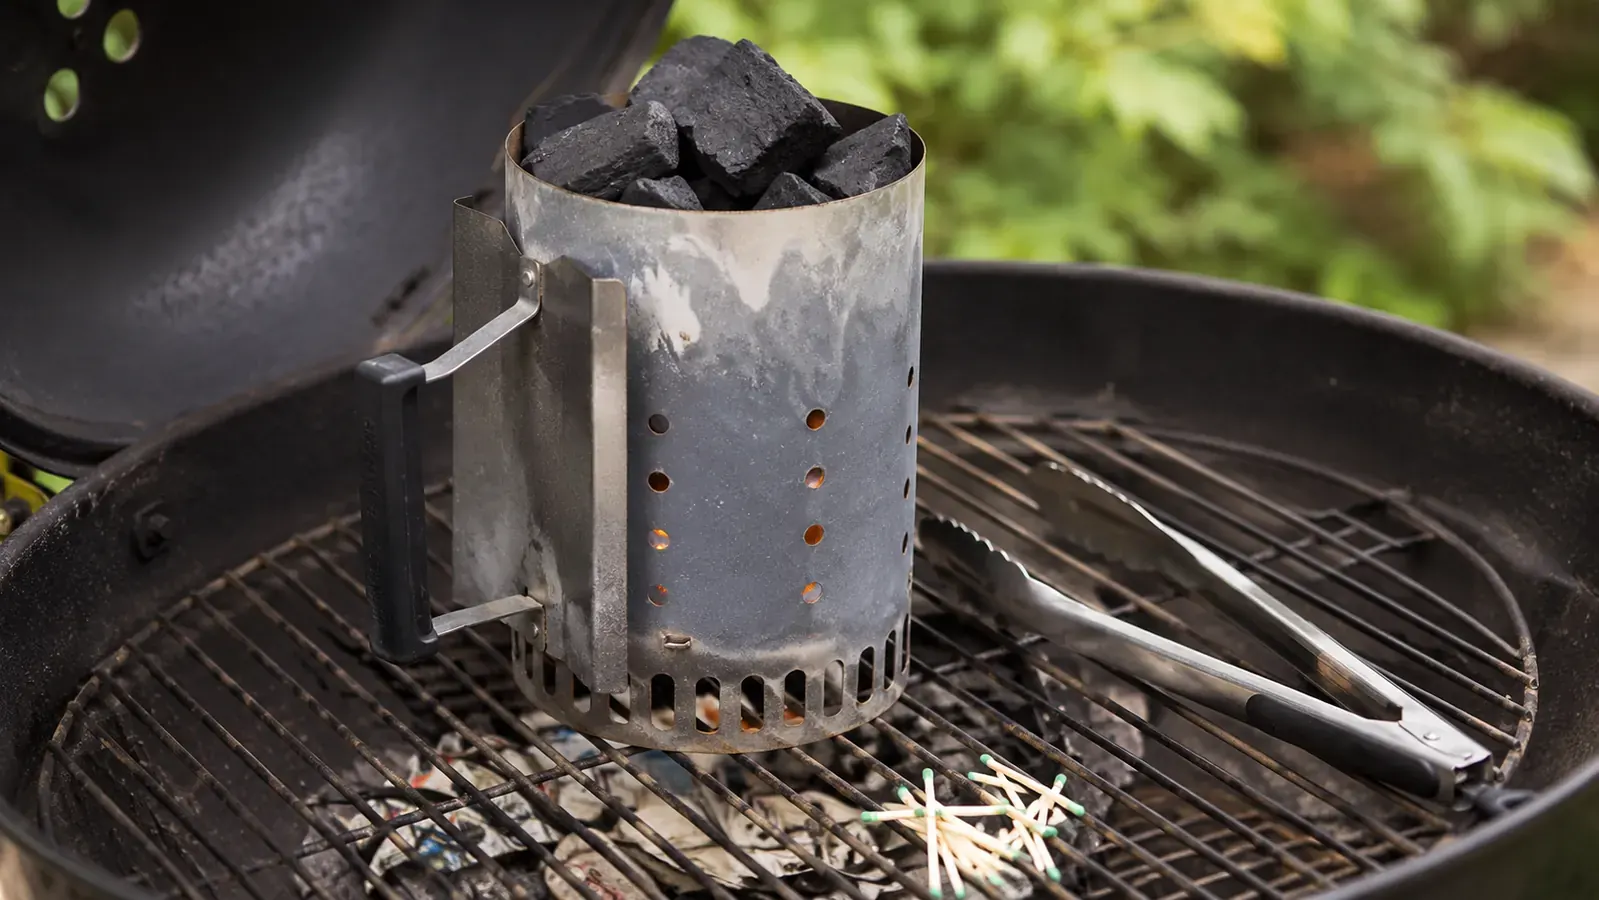
Step 1: Fill the Chimney with Charcoal
Lift the chimney and fill the top section with charcoal. For a standard 22-inch kettle grill cooking burgers or chicken, I fill it about three-quarters full. That is roughly 80 to 90 briquettes if you are counting, or a generous armful of lump. For a longer cook, like ribs or a pork shoulder where you will need sustained heat, fill it all the way to the top and plan to add a second load partway through.
Do not pack the charcoal tightly. You want air to move up through the chimney, so leave the charcoal loose. If you are using briquettes, just dump them in and give the chimney a gentle shake so they settle naturally. The design of the chimney does the work of concentrating airflow, but you have to let it breathe.
The Weber Rapidfire has a compact and a full-size version. The compact version holds enough charcoal for smaller grills and quick cooks. The full-size holds more for bigger cooking sessions. I keep both, but if I had to pick one, the compact is the one I use most.
Step 2: Load the Newspaper Underneath
Flip the chimney over and look at the bottom section. There is a smaller cone-shaped chamber separated from the charcoal by a grate. That is where the newspaper goes. Take one sheet of newspaper, crumple it loosely into a ball, and stuff it up into that bottom cone. Then do the same with a second sheet. You do not need to pack it in tight. Loose crumples catch fire faster and burn longer than wadded-up paper.
No newspaper? You can use paper bags, the cardboard from an egg carton, or dedicated fire starters. I have used all of them. Newspaper is my default because it is light, it crumples well, and I always have some around. Avoid glossy inserts or magazine paper. They do not burn as cleanly and can leave a waxy residue. Plain newsprint only.
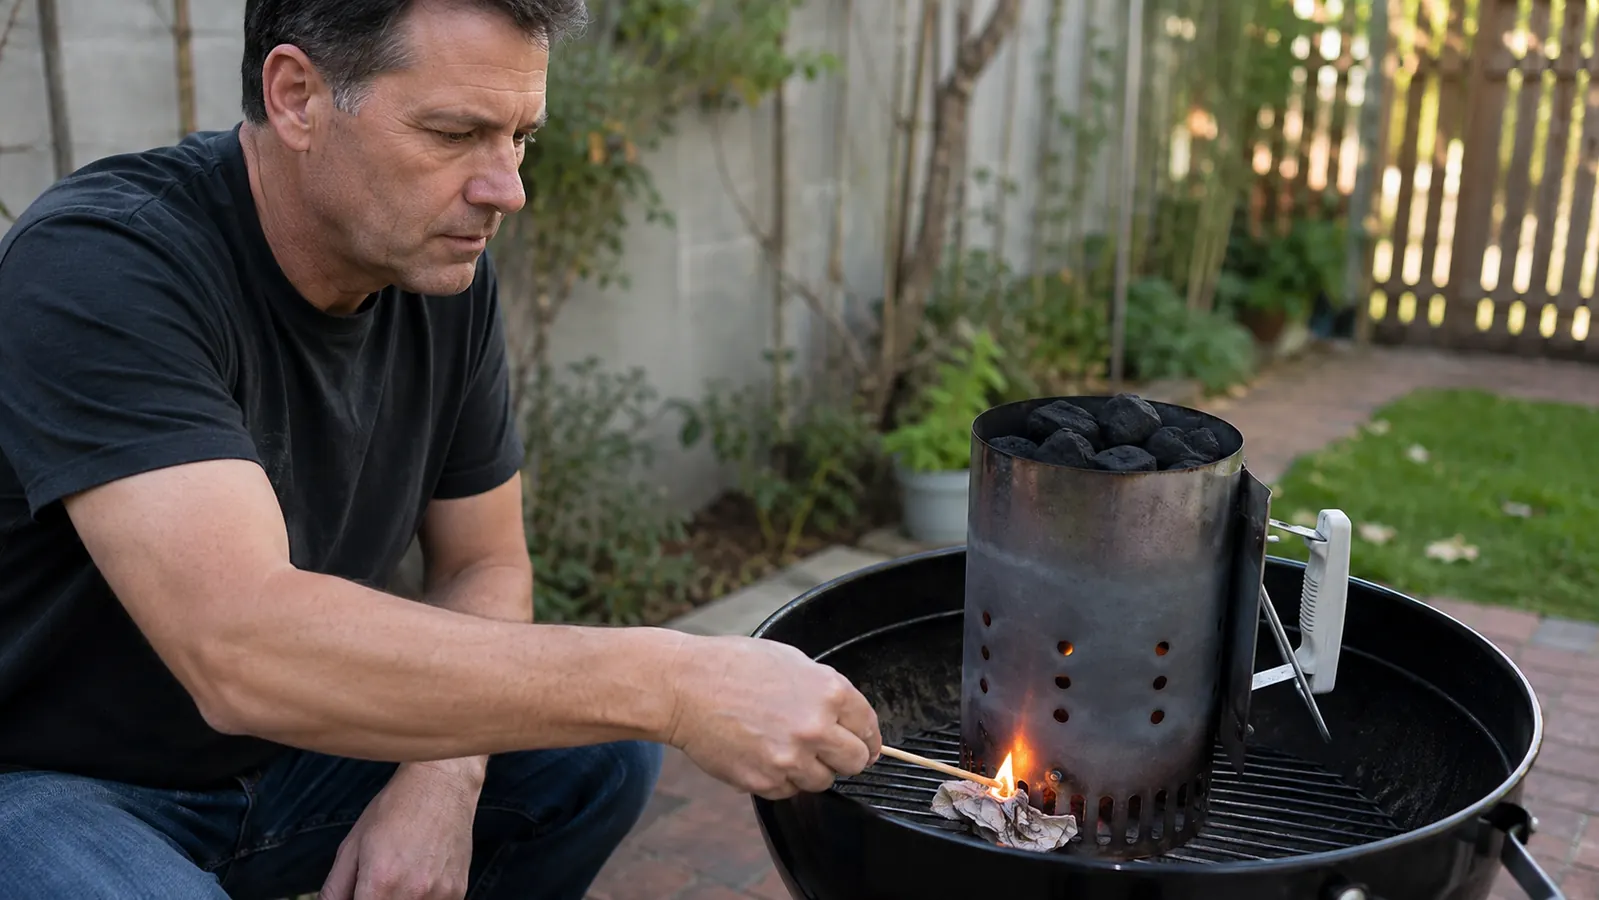
Step 3: Set the Chimney on the Grill and Light the Paper
Set the loaded chimney starter on the lower grill grate of your kettle or on a non-flammable surface like a concrete patio or stepping stone. Do not set it in the grass. The bottom of the chimney gets very hot and will scorch grass or wooden deck boards in a hurry.
Take a long match or a lighter, reach underneath the chimney, and light the newspaper in two or three spots around the perimeter. You want the paper to catch in multiple places so the flame spreads evenly across the bottom of the charcoal stack. Once the paper is going, step back and let the chimney do its work. The tall metal tube creates a natural draft that pulls air up from the bottom and fans the flame into the charcoal above.
You will see smoke billowing from the top for the first few minutes. That is completely normal. It is the charcoal igniting and releasing moisture. Within four or five minutes the smoke will thin out and you will start to see orange glow at the top of the charcoal pile.
Step 4: Wait for Ash-White Edges on the Top Coals
This is the step that trips up the most beginners. People see fire and assume the coals are ready. They are not. You need to wait until the charcoal at the very top of the chimney shows a gray-white ash coating around the edges with an orange glow in the center. That ash coating tells you the coal has reached its peak temperature and is ready to transfer heat evenly to your food.
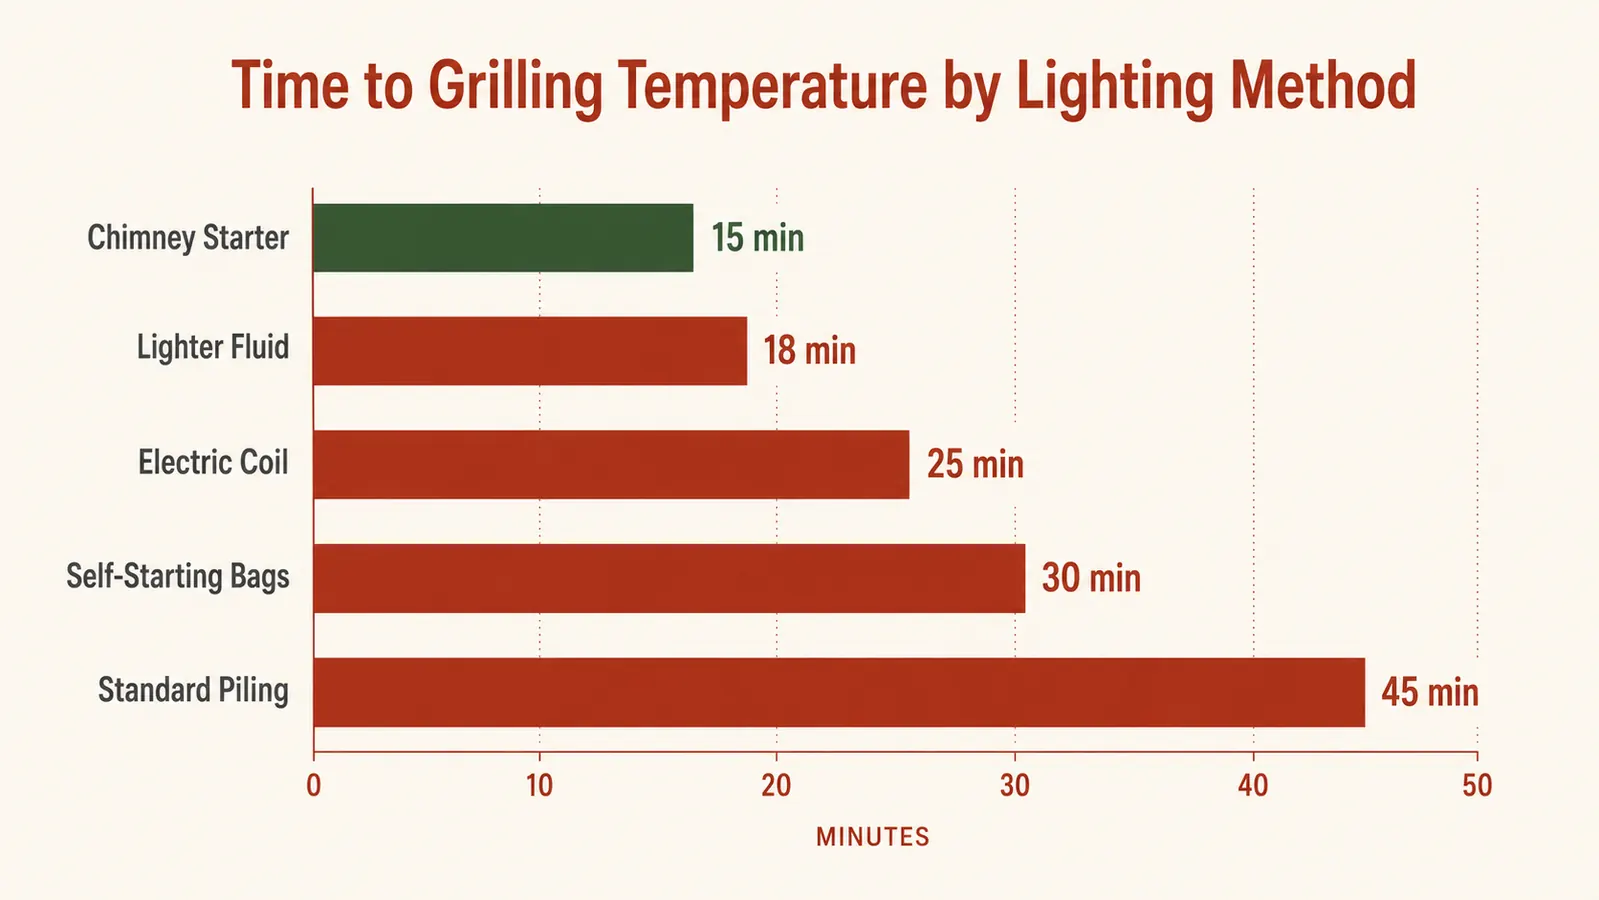
From the time you light the newspaper, plan on 12 to 15 minutes for briquettes, and 10 to 12 minutes for lump charcoal. Set a timer and use that waiting time to prep your food. Season your steaks, build your burgers, set up your two-zone cooking arrangement in your head. By the time you are done prepping, the coals are ready to pour.
One thing I have noticed with the Weber Rapidfire specifically: the vent holes in the bottom cone are well-placed and sized just right to maintain a strong draft without throwing too many sparks. Cheaper chimneys can have smaller holes that slow down the process or larger holes that throw sparks further. The Weber design is genuinely well thought out, which is part of why it has over 42,000 reviews and a 4.8-star rating after all these years.
Ash-white edges and orange glow at the center. That is the sign you are ready to pour. Do not rush it and do not skip the wait.
Step 5: Pour the Coals and Arrange for Your Cook
Grab your grill gloves, not your oven mitts. The handle on the Weber Rapidfire stays cool enough to touch, but the radiant heat coming off 90 lit coals is significant and you want your hands covered. Grip the chimney handle firmly and tilt it to pour the coals into your grill in whatever arrangement suits your cook.
For most cooks, I dump the coals to one side of the grill to create a two-zone setup. Hot coals on one side for direct searing, empty side for indirect heat when food needs more time without burning. If I am doing a full grill of burgers for a crowd, I spread the coals evenly across the bottom for high direct heat across the whole grate.
After pouring, let the coals settle for a minute, then put the cooking grate back on and close the lid for five minutes with the vents open. This preheats the grate so you get those clean sear marks instead of food sticking to a cold grate. Open the lid, set your food down, and you are grilling.
What Else Helps
A few extra things that make the chimney method even easier over time. First, keep a dedicated spot near your grill for storing the chimney. I hang mine on a hook on the side of my shed. It needs to be fully cooled before you store it, usually 30 minutes after you empty it, but once it cools it is compact and easy to stash.
Second, if you are grilling in wind, point the vented side of the chimney toward the wind direction. Wind can either help your chimney draft faster or disrupt the flame depending on how it hits the vents. Facing the vents into the wind tends to push more air through the bottom and speed up ignition.
Third, use a quality charcoal. I have used every brand out there over nine years and the ones that light most reliably in a chimney are Kingsford Original or any natural hardwood lump without excessive dust. Cheap charcoal with a lot of dust and fines can clog the chimney vents and make the whole process slower. It is worth spending a dollar or two more per bag to get charcoal that cooperates.
For a deeper look at how the Weber Rapidfire holds up over years of repeated use, including a few honest drawbacks I found, head over to my full review. And if you are comparing this chimney method to an electric starter, that article breaks down the timing and cost side by side across ten real lighting sessions.
Why Skip Lighter Fluid Altogether
I know I have mentioned it a few times already but I want to be clear about why lighter fluid is worth ditching for good, not just skipping sometimes. Petroleum-based lighter fluid does not fully burn off in the first few minutes even though the flame looks clean. Trace residue clings to the charcoal and vaporizes as the coals heat up. That vapor hits your food, especially fatty foods like burgers and chicken thighs where there are a lot of drips, and it leaves a taste that does not belong there. Some people are so used to it they do not notice anymore. But cook with a chimney starter for one season and then go back and try lighter fluid on a burger, and you will catch it immediately.
Beyond taste, lighter fluid takes longer than most people think. You pour it on, you wait three or four minutes for it to soak in, you light it, you wait for the fluid to burn off, you wait for the coals to actually get hot. The whole process easily runs 25 to 30 minutes if you are doing it right and not rushing into raw coals. The chimney method is legitimately faster, and you get better coals at the end of it.
One purchase that makes every single cookout better
The Weber Rapidfire Chimney Starter is what I pull out before every single cook. About 12 minutes from match to grill-ready. Zero lighter fluid, zero off-flavors, 42,000+ happy grillers on Amazon. Check today's price before your next cookout.
Amazon Check Today's Price on Amazon →